The Ultimate Guide to Mastering Gluten-Free Sourdough

When I walked away from my professional kitchen after my Celiac diagnosis, I felt like I had lost my voice. In the culinary world, bread is the foundation. It is the texture, the scent, and the soul of a meal. For years, I believed that "gluten-free" was a synonym for "dense, crumbly, and uninspiring." I was wrong. After hundreds of failed attempts and countless discarded loaves, I discovered that mastering gluten-free sourdough isn't about replicating wheat—it is about understanding the chemistry of alternative starches and the delicate dance of wild yeast.
Sourdough is a living entity. While traditional wheat sourdough relies on a strong gluten network to trap gases, gluten-free sourdough relies on hydrocolloids and starch gelatinization. This guide is designed to move you past the "hobbyist" stage and into the realm of precision baking. We are not just making bread; we are engineering structure.
The Foundation: Understanding Your Starter
In a traditional bakery, the starter is a predictable beast. In a gluten-free kitchen, your starter is your most volatile and vital tool. You cannot simply use a generic "GF flour blend" and expect consistent results. To achieve a professional-grade crumb, you must cultivate a culture specifically designed for gluten-free grains.
The Ideal Flour Base: I recommend a blend of brown rice flour and sorghum flour. These grains provide a neutral, slightly nutty base that allows the lactic acid of the fermentation to shine. Avoid using too much buckwheat unless you want a heavy, earthy loaf that lacks lift. As the gluten-free flour market continues to expand, you will see more specialized blends, but for sourdough, I suggest building your own to maintain control over the protein-to-starch ratio.
The Starter Protocol
To create a robust GF starter, follow this specific ratio:
- 50g Brown Rice Flour
- 50g Filtered Water (ensure it is chlorine-free to avoid killing the wild yeast)
- A pinch of organic millet flour (for extra micronutrients)
Feed this culture every 24 hours. You are looking for a starter that doubles in volume within 4–6 hours of feeding. If it isn't active, your bread will be a brick. There is no middle ground.
The Architecture of Structure: Hydrocolloids and Starches
The biggest mistake amateur bakers make is treating GF dough like wheat dough. Without gluten, your dough has no "stretch." To prevent a collapsed loaf, we must introduce structural agents. This is where the science of the kitchen meets the art of baking.
Psyllium Husk: The Non-Negotiable
If you are serious about sourdough, you must use whole psyllium husk, not just the powder. Psyllium acts as the "glue" in the absence of gluten. It creates a gel that traps the CO2 produced by your wild yeast. I recommend a ratio of 5% to 7% of the total flour weight. This provides the elasticity needed to shape the loaf without it turning into a puddle of goo.
The Role of Tapioca Starch
While rice flour provides the body, tapioca starch provides the "chew." A high-quality tapioca starch will give you that slightly bouncy, sourdough-typical texture. Without it, your bread will feel gritty and dry.
The Master Recipe: The "Elena Standard" GF Sourdough
This recipe is designed for those who demand excellence. It requires patience, but the result is a loaf with a crispy crust and a tender, open crumb.
Ingredients
- The Levain: 100g active GF sourdough starter, 50g brown rice flour, 50g water.
- The Main Dough:
- 300g Sorghum Flour
- 150g Brown Rice Flour
- 100g Tapioca Starch
- 15g Whole Psyllium Husk
- 350g Warm Water (approx. 90°F/32°C)
- 10g Sea Salt
- 5g Honey or Maple Syrup (to assist initial fermentation)
The Process: Step-by-Step
1. The Autolyse Phase
Mix your flours, starches, and psyllium husk with the warm water. Let this sit for 30 minutes. This is the "autolyse" phase. In wheat baking, this develops gluten; in GF baking, this allows the psyllium to fully hydrate and create the necessary gel structure before the yeast begins its work. If you skip this, your dough will be inconsistent.
2. Incorporating the Levain
Add your active starter and the honey to the hydrated flour mixture. Mix thoroughly with a sturdy spatula or a stand mixer with a paddle attachment. The dough should feel more like a thick, heavy paste than a traditional wheat dough. This is normal.
3. Bulk Fermentation and Temperature Control
Cover the dough with a damp cloth and let it rise in a warm spot (75°F–78°F) for 4 to 6 hours. During this time, you should see the dough grow in volume and develop small air bubbles. This is the most critical stage. If your kitchen is cold, the fermentation will stall. If you find your environment is too inconsistent, consider how your workspace design and ambient environment can affect your productivity—and your baking. A controlled, warm environment is essential for microbial activity.
4. Shaping the Loaf
Gently transfer the dough onto a surface lightly dusted with rice flour. Since there is no gluten to tension, you must use the psyllium-rich dough to create a skin. Fold the edges toward the center to create a taut surface. Place the loaf upside down in a proofing basket (banneton) lined with linen and extra rice flour.
5. The Cold Proof
For the best flavor profile, place your proofing basket in the refrigerator for 12 to 24 hours. This "cold retard" allows the lactic acid bacteria to develop a complex, tangy flavor that a quick rise simply cannot achieve. This is also a great time to focus on other seasonal tasks, such as reviewing trending lifestyle topics or organizing your digital life, while your bread does the heavy lifting.
6. The Bake
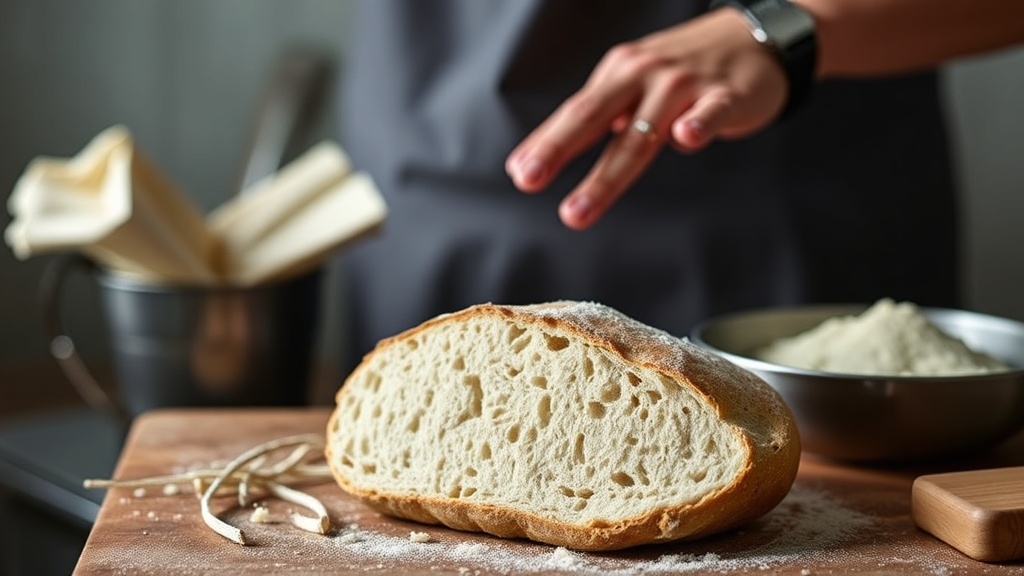
Preheat a Dutch oven in your oven at 475°F (245°C) for at least 45 minutes. This ensures maximum heat retention for a dramatic "oven spring." Carefully flip the dough into the hot Dutch oven. Score the top with a sharp lame to control the expansion. Bake covered for 30 minutes, then remove the lid and reduce the heat to 425°F (220°C). Bake for another 20–25 minutes until the crust is a deep, mahogany brown. A pale crust is a sign of an underdeveloped bake.
Troubleshooting Common Failures
"A baker who does not respect the variables is a baker who is destined for disappointment."
If your loaf came out flat, dense, or gummy, do not be discouraged. It is likely one of three things:
- Weak Starter: If your starter hasn't doubled in volume, it lacks the strength to lift the heavy GF flours. Ensure you are feeding it with high-quality, fresh flour.
- Insufficient Hydration: GF flours absorb water differently than wheat. If your dough felt too stiff during the mixing stage, you may need to increase your water by 10-20g next time.
- The "Gummy" Crumb: This is almost always caused by slicing the bread while it is still warm. A gluten-free loaf continues to set its structure as it cools. If you cut it too early, the steam escapes, leaving a gummy, wet interior. Wait at least 4 hours before slicing.
The Art of the Aftermath
Once you have mastered the perfect loaf, do not let it go to waste. Even the most beautiful sourdough can become slightly firm after a few days. Rather than discarding it, use it as a base for gourmet meals. You can transform slightly hardened slices into incredible croutons or use them for a high-end version of French toast. For more ideas on maximizing your pantry, check out how to revive stale bread for delicious meals.
Mastering gluten-free sourdough is a journey of precision. It requires you to move away from the "handful of this, splash of that" mentality and move toward the discipline of a professional kitchen. But when you pull that steaming, crackling, perfectly tangy loaf from the oven, you will realize that the lack of gluten was never a limitation—it was an opportunity for a new kind of excellence.