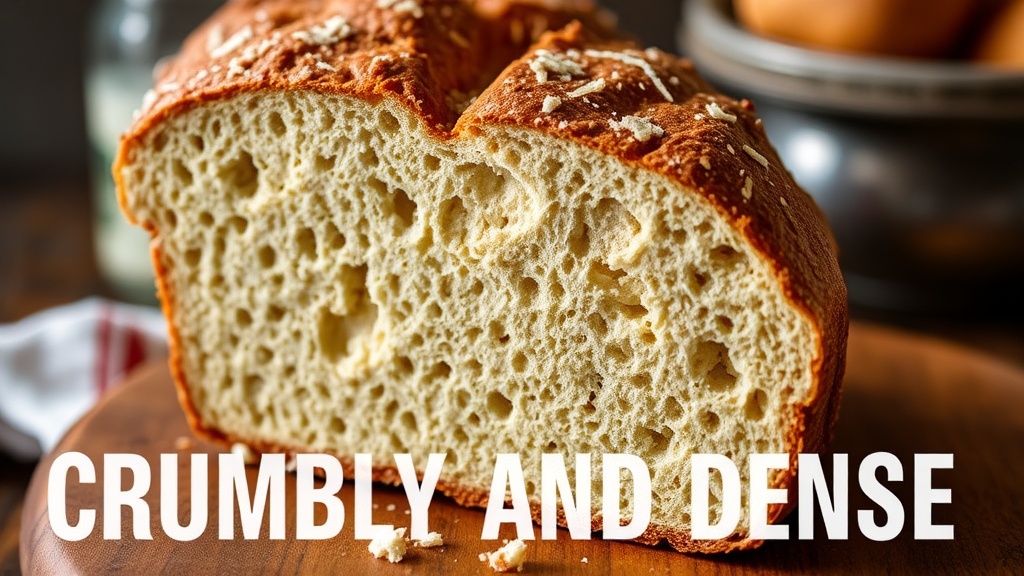
Why Your Gluten-Free Bread Is Crumbly and Dense

Most gluten-free home bakers believe that a dense, crumbly loaf is an inevitable byproduct of missing gluten. They assume that without the elastic protein network of wheat, a light and airy crumb is an impossible dream. This is a fundamental misunderstanding of food science. A crumbly texture is rarely a lack of gluten; it is usually a failure in hydration, structural binders, or flour aeration. This post breaks down the three primary culprits behind poor gluten-free bread texture and provides the technical adjustments necessary to achieve a professional-grade loaf.
The Hydration Gap: Why Your Dough Is Too Dry
In traditional baking, wheat flour absorbs water at a predictable rate. Gluten-free flours, particularly those heavy in rice flour or starches like tapioca and potato starch, behave differently. These ingredients are highly absorbent, but they require significantly more moisture to reach a functional state. If your bread feels like a stiff paste rather than a supple dough, you are likely dealing with a hydration deficit.
A lack of moisture prevents the starches from gelatinizing properly, which results in a "gritty" mouthfeel and a loaf that disintegrates the moment you slice it. When you are working with blends like King Arthur Measure for Measure or Bob’s Red Mill 1-to-1, you must account for the fact that these blends are often "thirstier" than wheat flour. If the dough is too dry, the air bubbles created during fermentation cannot expand, leading to a dense, heavy interior.
To fix this, you must master the relationship between liquid and dry mass. Increasing your water or milk content by even 5% can transform a brick into a loaf with a soft, springy crumb. However, you cannot simply add water haphazardly. You must understand balancing hydration in gluten-free bakes to ensure the structure remains stable. If you add too much liquid without a corresponding increase in binders, your bread will collapse in the oven, resulting in a gummy, wet center.
Practical Hydration Adjustments
- Use a Digital Scale: Stop using measuring cups. Volume is inconsistent; grams are absolute. A "cup" of rice flour can vary by 20 grams depending on how tightly it is packed, which completely alters your hydration ratio.
- The Temperature Test: Ensure your liquids are lukewarm (approximately 105°F to 110°F). Warm liquids help the starches hydrate more quickly and activate yeast more efficiently.
- The "Sticky" Standard: Unlike wheat dough, which is often tacky but manageable, gluten-free bread dough should often feel more like a thick, heavy batter. If it holds a shape like a traditional bread dough, it is likely too dry.
The Binder Breakdown: The Role of Hydrocolloids
Gluten provides the "scaffolding" for bread. Without it, you must rely on hydrocolloids—substances like xanthan gum, guar gum, or psyllium husk—to mimic that structural integrity. If your bread is crumbling into a pile of sand, your binder ratio is either insufficient or improperly incorporated.
Xanthan gum is the industry standard for a reason: it provides viscosity and helps trap gas bubbles. However, many home bakers treat it as an afterthought. If you add xanthan gum at the very end of the mixing process, it may not be fully integrated, leading to "hot spots" of gumminess and areas of extreme brittleness. For a more natural, fiber-rich structure, many professional gluten-free bakers are moving toward psyllium husk, which provides a more "bread-like" chew and better moisture retention.
When the binder fails, the air bubbles produced by the yeast escape before the crust can set. This leads to a loaf that looks risen in the oven but deflates into a dense, flat disc as soon as it hits the cooling rack. To prevent this, you must ensure your binders are perfectly distributed. This is where perfecting texture with xanthan becomes a vital skill, as the principles of viscosity and suspension apply directly to your dough's stability.
Choosing Your Structural Support
- Xanthan Gum: Best for quick, easy-to-use commercial blends. It provides excellent viscosity but can sometimes result in a slightly "rubbery" texture if overused.
- Psyllium Husk: The gold standard for artisan gluten-free loaves. It creates a much more sophisticated crumb and allows for better dough handling. Use whole husk for maximum structural benefit.
- Egg Whites: For those who are not vegan, incorporating whipped egg whites can provide a physical lift that complements your chemical binders, adding much-needed lightness to the crumb.
The Aeration Error: Compaction and Flour Density
Even with perfect hydration and the right amount of xanthan gum, your bread can still turn out dense if your flour is poorly prepared. One of the most common mistakes in the gluten-free kitchen is failing to aerate the dry ingredients. Because gluten-free flours are often made from finely ground grains, starches, and legumes, they tend to settle and compact in the bag or container.
If you scoop flour directly from a dense, settled container, you are adding far more weight to your recipe than the instructions intend. This excess weight crushes the delicate air bubbles that the yeast is trying to create, resulting in a heavy, "dead" loaf. To achieve a light crumb, you must treat your flour with the same respect a pastry chef treats cake flour.
Aeration is not just about making the flour lighter; it is about ensuring that every particle of starch and binder is evenly coated. If your flour is clumped, the moisture will not distribute evenly, creating pockets of dryness (crumbliness) and pockets of gumminess. This lack of uniformity is a hallmark of amateur gluten-free baking.
How to Properly Prepare Your Dry Mix
Before you even begin mixing your wet and dry ingredients, follow these professional steps to ensure your flour is ready for high-performance baking:
- Sift Twice: Sift your flour blend through a fine-mesh sieve at least twice. This removes any clumps and introduces air between the particles.
- The Aeration Technique: If you do not have a sieve, use a whisk to vigorously beat the flour in its mixing bowl for 30 seconds before adding any liquids. This breaks up the density of the starches.
- Check the Blend: If you are using a pre-mixed blend, check the ingredient list for "settling" ingredients. If you see a lot of heavy starches like tapioca or arrowroot at the bottom of your container, you must mix the bag thoroughly before measuring.
The Temperature and Timing Factor
Finally, we must address the environment. Gluten-free dough is far more sensitive to temperature than wheat dough. If your kitchen is too cold, the yeast will not produce enough carbon dioxide to lift the heavy, starch-laden dough. If your oven is too hot, the crust will set before the interior has finished expanding, trapping the steam and creating a dense, gummy center.
A professional approach requires monitoring the internal temperature of your loaf. A truly finished gluten-free loaf should have an internal temperature of at least 205°F (96°C). If you pull the bread out when the crust looks "done" but the center is still at 190°F, the starches will not be fully set. As the bread cools, the steam will condense, and your once-airy loaf will turn into a dense, wet mass.
Pro-Tip: Always allow your gluten-free bread to cool completely on a wire rack before slicing. This is the hardest part of the process, but it is non-negotiable. Slicing into a warm gluten-free loaf disrupts the final stage of starch setting, which inevitably leads to a crumbly, messy texture. The bread needs that time to "set" its structure through cooling.
Summary Checklist for Better Bread
Before your next bake, run through this technical checklist to ensure you aren't repeating the same errors:
- Is my hydration calculated by weight (grams) rather than volume?
- Did I aerate my flour blend to prevent density?
- Is my binder (xanthan or psyllium) fully integrated and not clumped?
- Am I using a digital thermometer to ensure the center reached 205°F?
- Am I waiting for the loaf to reach room temperature before cutting?